Our first hint for this week’s Student Project, is a pretty simple one but something that almost every first-time user mistakes.
Hint #1 – In Scratch, the pen tools apply to each sprite individually. If you have 2 sprites on your stage and you use a code block on one sprite to change the color of the pen, it will only change the color of pen strokes created by that sprite. Any strokes created by the other sprite will stay as whatever color that pen was set to. Changing the color of the pen on one script does not change the color of the pen for any other sprites or scripts.
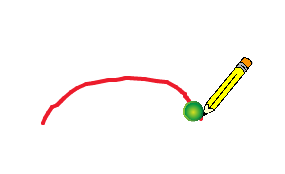
Hint #2 – If you’re trying to duplicate the image so that the tip of your pencil is actually what’s drawing, you’ll need to fake it. Scratch’s pen tools always work from the center of a sprite. If you want the pen to write from the tip of the pencil, create 2 sprites – a “pen tip” and the pencil. Use the “Motion” blocks to make the pencil follow the “pen tip” and adjust the pencils position. Then, just hide the “pen tip” sprite. Scratch will still run all the scripts for the pen tip but users won’t know that the pencil isn’t actually drawing!!
Here’s what our sprite setup would look like with a pencil and a pen tip